
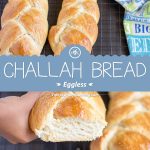
This Braided Eggless Challah Bread is an eggless version of the famous Jewish braided Shabbat challah bread.
Braided Eggless Challah Bread
The third recipe that I am going to share today is Braided Eggless Challah Bread. Its classic version is popularly known as Shabbat challah. It’s a Hebrew word, and it pronounced as Hallah. The braided bread is famous in Israel and pretty much among all the Jewish communities worldwide. There are different names for this bread, and it is known by various names in different countries.
This Challah bread is a part of the traditional Sabbath meal. Today I am presenting the Eggless version of this challah bread with a single braid, and so with this recipe, the yeast bread series begins too. :-)
I have posted yeast based no knead whole wheat bread during 2015 bakethon. And here is my second bread recipe after two years. :-) I am not sure what kept me away from baking these breads. After preparing few types of bread for this marathon, here is my thought about bread baking. In my opinion, bread baking is not difficult but its time consuming, especially when the recipe calls for double, triple rise.
Bread Baking
Before starting my bread baking, I read quite a few articles about yeast and dough kneading and how long we can keep the dough after the rise, refrigerating the raised dough, etc., etc. There is a stack exchange forum for bread baking too. :-) But as always practical knowledge helps a lot, and the same thing happened with breads too. I understood a lot about yeast and dough rose when I tried on my own.
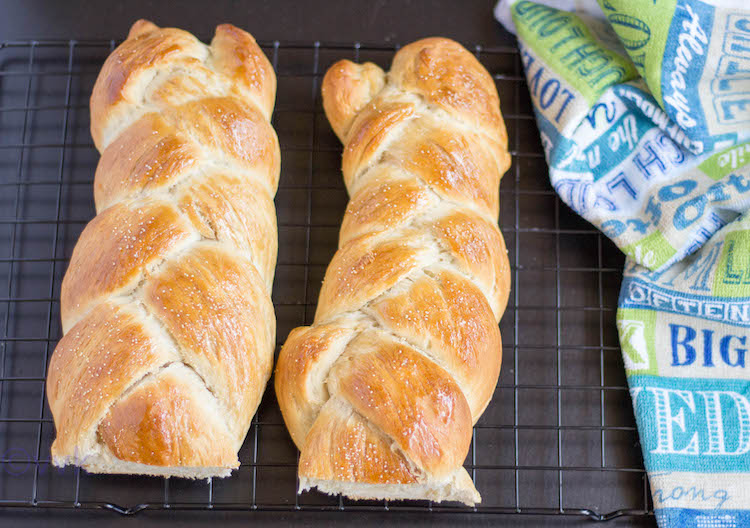
There is a lot to learn and master but here is my first braided bread attempt, and honestly, I was quite happy with the result. Vaandu and M enjoyed this bread, and I baked two loaves of bread(Challah and one more) back to back, and this one was the first one to get over. PS –
Challah Bread Planning
As I mentioned, baking bread consumes time, but if you plan well ahead it’s very easy to prepare, and as we are dealing with yeast, temperature plays a significant role in the dough rise which in turn affects the time too. For this bread, it took me about 2.5 hours for the dough to rise, and I let it sit for half an hour as I had to run out for an errand. For other bread, it took me 2 hours and in some case the dough raised nicely within 1.5 hours. So the temperature plays a significant role. I baked all the bread during day time.
What I also read was that you could leave the dough for up to 1.5 to 2 hours after the rise. Beyond that, even though the dough might be edible, you might lose the structure, and dough would collapse. Hence planning is the key while baking these bread.
Recap Before the Recipe
- 2015 | Day 3 – Strawberry Dates Loops
- 2016 | Day 3 – Cauliflower Kurma Kuzhambu
- 2017 | Day 3 – C | Challah
I followed the recipe from here and went with the same measurements but made a single straight braid instead. But you can join the ends and make it into a circular braided bread, or even add multiple twists. Without any further ado, here is the Braided Eggless Challah Bread that I’ve prepared.
Eggless Braided Challah Bread Recipe
Ingredients:
For yeast proofing:
- Lukewarm water – ¼ cup
- Sugar – ¼ tsp
- Active dry yeast – 1 packet or 2 ¼ tsp
- Canola oil – ¼ cup
For the bread:
- All purpose flour – 3 cups + as required
- Sugar – ¼ cup
- Salt – ½ tsp
- Water – ¾ cup
For Brushing:
- Maple Syrup – 3 tbsps
- Poppy Seeds – 2 tbsps
Steps:
Yeast Proofing:

- Add the sugar and yeast to the lukewarm water and let it sit for 10 minutes.
- After 10 minutes, the water will be bubbly and frothy. (In parallel sieve the dough as mentioned below)
- To this add the canola oil and mix with a wood spoon or with the back of the wooden ladle.
- The yeast mixture is ready.
Preparing the dough:

- While the yeast doing its magic, in a wide mixing bowl sieve the flour, sugar, salt.
- Add the yeast mixture and mix the dough gently.
- Now slowly add water (2 tbsps. at a time) and start mixing the dough to form a ball.
- If the dough is sticky, add more flour or if it’s too dry add more water.
- Grease a big vessel with sufficient room for the dough to rise with oil.
- Spread some oil on top of the dough too. Keep this dough in the greased vessel and wrap it with cling film and set aside.
- I kept it inside my oven. It took me 2.5 hours for the dough rise.
Kneading:

- Once the dough has raised, remove the cling film and punch it down.
- Knead it on lightly floured surface for 10 minutes to build the gluten content and to remove all the air pockets. This also helps in the bread texture.
Braiding:

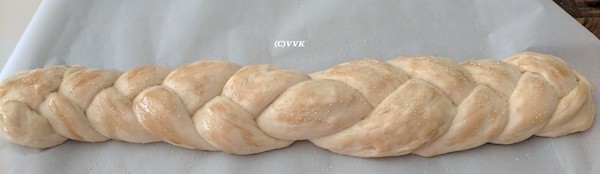
- Roll the dough into a single log and divide it into three equal portions.
- Now roll the individual sized portions into a log like below and set them all in parallel.

- I went with single braid and started from the middle like below.
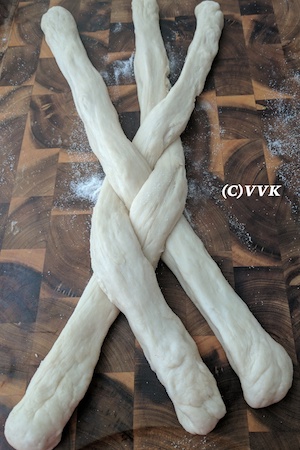
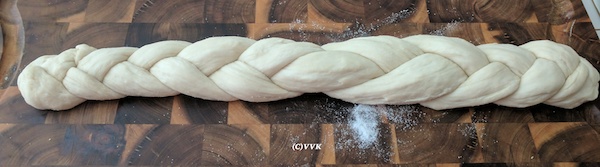
- Once you reach the edge, bring the three logs together and seal them and follow the same on the other side too.
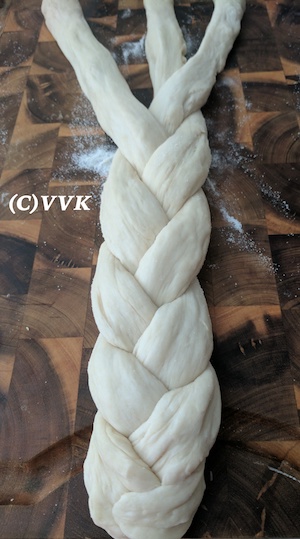
- You can now bring the edges together and make into a circle, but I left it in this way.
Second Rise & Maple Syrup Brushing:
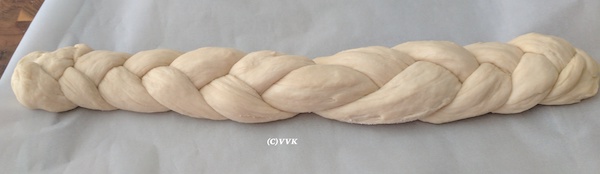
- Now carefully place this braided bread on a baking tray lined with parchment paper.
- Let it sit for 30 minutes allowing the dough to rise again.
- When it is past 20 minutes, preheat the oven to 350 deg C.
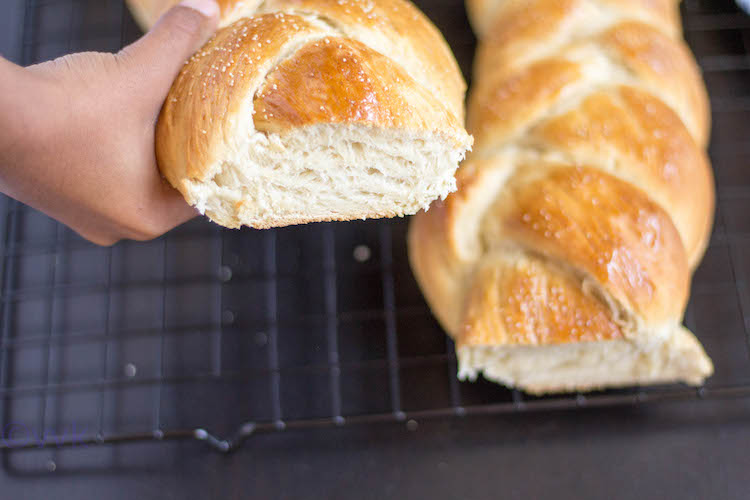
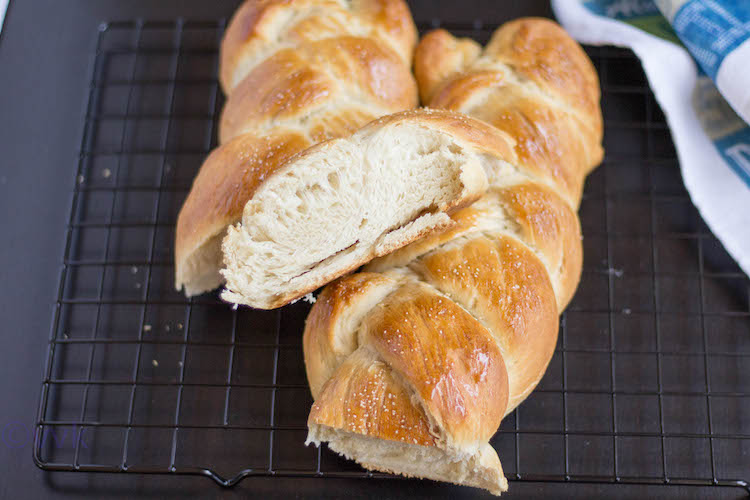
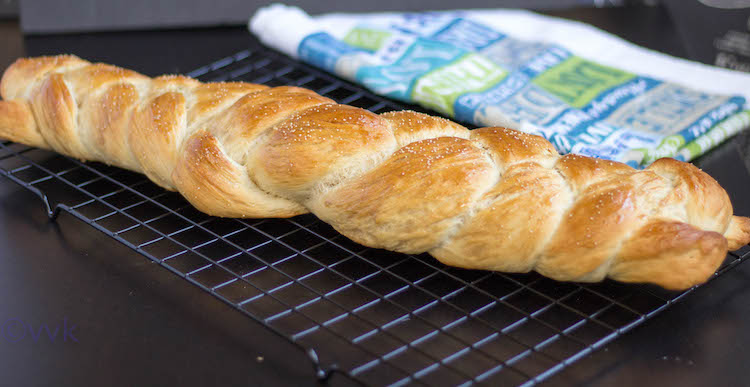
- After 30 minutes, brush the bread with maple syrup and drizzle some poppy seeds. Your eggless challah bread is reaady for baking!
Baking:
- Bake this bread for 25 minutes and after 25 minutes, brush it with maple syrup one more time and bake again for 5 minutes at 350 deg F.
That’s it. :-) Allow your braided eggless challah bread to cool and enjoy! The bread stayed fresh for up to 4 days. I did not refrigerate it for the first two days, but I did later. Just warm the bread up before serving.
Notes:
- Temperature plays a significant role in dough rise so wait patiently but during warm weather check the dough after an hour.
- Kneading for at least 10 minutes is important after the raise.
- The original challah bread recipe calls for 1 cup of water, but I used only about a ¾ cup. The quality of the flour plays a role here, so add water little by little while forming the dough.
- If you are using instant yeast, no proofing is required. You can directly add it to the flour. In that case, add more water.
- You can replace maple syrup with honey.
Enjoying Braided Eggless Challah Bread? You will love these, too:
- Vanocka Bread | Czech Braided Christmas Bread | Eggless Vánočka
- Mandelbrot | Mandel Bread | Eggless Almond Biscotti
- Ellu Urundai | Nut Free Sesame Seed Balls | 2 in 1 recipe
- All Breads
PS – I have few easy bread recipe too. Check out how to make zaatar bread, simple white bread, focaccia.
📖 Recipe
Challah Bread | Eggless Braided Challah
Ingredients
For yeast proofing
- ¼ cup Lukewarm water
- ¼ tsp Sugar
- 1 packet Active dry yeast or 2 ¼ tsp
- ¼ cup Canola oil
For the bread
- 3 cups All purpose flour + as required
- ¼ cup Sugar -
- ½ tsp Salt
- ¾ cup Water
For Brushing
- 3 tbsps Maple Syrup
- 2 tbsps Poppy Seeds
Instructions
- Yeast Proofing:Add the sugar and yeast to the lukewarm water and let it sit for 10 minutes.
- After 10 minutes, the water will be bubbly and frothy. (In parallel sieve the dough as mentioned below)
- To this add the canola oil and mix with a wood spoon or with the back of the wooden ladle.
- The yeast mixture is ready.
- Preparing the dough:While the yeast doing its magic, in a wide mixing bowl sieve the flour, sugar, salt.
- Add the yeast mixture and mix the dough gently.
- Now slowly add water (2 tbsps. at a time) and start mixing the dough to form a ball.
- If the dough is sticky, add more flour or if it’s too dry add more water.
- Grease a big vessel with sufficient room for the dough to rise with oil.
- Spread some oil on top of the dough too. Keep this dough in the greased vessel and wrap it with cling film and set aside.
- I kept it inside my oven. It took me 2.5 hours for the dough rise.
- Kneading:Once the dough has raised, remove the cling film and punch it down.
- Knead it on lightly floured surface for 10 minutes to build the gluten content and to remove all the air pockets. This also helps in the bread texture.
- Braiding:Roll the dough into a single log and divide it into three equal portions.
- Now roll the individual sized portions into a log like below and set them all in parallel.
- I went with single braid and started from the middle like below.
- Once you reach the edge, bring the three logs together and seal them and follow the same on the other side too.
- You can now bring the edges together and make into a circle, but I left it in this way.
- Second Rise & Maple Syrup BrushingNow carefully place this braided bread on a baking tray lined with parchment paper.
- Let it sit for 30 minutes allowing the dough to rise again.
- When it is past 20 minutes, preheat the oven to 350 deg C.
- After 30 minutes, brush the bread with maple syrup and drizzle some poppy seeds.
- Baking:Bake this bread for 25 minutes and after 25 minutes, brush it with maple syrup one more time and bake again for 5 minutes at 350 deg F.
- That’s it. :-) Allow it cool and enjoy! The bread stayed fresh for up to 4 days. I did not refrigerate for the first two days, but later I did. Just warm it up before serving.
Notes
- Temperature plays a significant role in dough rise so wait patiently but during warm weather check the dough after an hour.
- Kneading for at least 10 minutes is important after the raise.
- The original recipe calls for 1 cup of water, but I used only about a ¾ cup. The quality of the flour plays a role here, so add water little by little while forming the dough.
- If you are using instant yeast, no proofing is required. You can directly add it to the flour. In that case, add more water.
- You can replace maple syrup with honey.
- Adapted from The Challah Blog
Nutrition
I am not a nutritionist. The nutritional information is provided as a courtesy and is an estimate only. It varies depending upon the product types or brands.
![]()
Check out the Blogging Marathon page for the other Blogging Marathoners doing BM# 75.
[inlinkz_linkup id=693882 mode=1]

Again this bread scares me totally. Looking at yours I should try this.Bookmarked
You rocked with your Vanocka.. This should be easy for you… Try it out Sapana.
This loaf looks beautiful!
Thanks
Yum!! Ive never made challah bread before but this looks great!
Thank you Liz.
another C for challah. Your braide has come out perfectly.
Thanks a lot Ruchi.
Gorgeous loaf of bread Vidhya. Beautifully braided and lovely crumb.
Thanks much Pavani.
That is a beautiful braid and a lovely colour. Looks perfectly baked.
Thanks a lot Veena.
so neatly done Vidhya, you got a nice color for the bread too..
Thanks Pradnya
Looks awesome,I so love that golden crust!!
Thanks Sharmila
Oh that Challah looks stunning Srividhya, very good attempt. Hopefully after this success you will be more regular in bread baking..:)
Oh yeah hoping so Valli. Thanks a lot.
I have never used yeast, for some reason i m kind of scared to give it a try. bread turned out wel Sri
Thanks ma. When it comes to yeast, I was like that too.. Give it try da..
Beautiful braided bread. I wanted to bake this as well for the letter C. But went ahead with Ciabatta!!
Ohh ok.. Thanks Harini.
How wonderful those challah breads looks. Wish to slice those beauties and enjoy with some nutella spread. Challah rocks Vidhya.
oh wow.. yum with nutella.
Same pinch to you too Srividhya. Your challah looks gorgeous with a beautiful braid and a lovely colour. Kudos! Do bake bread more frequently
he he.. Thanks Sowmya. Yes, got to bake more breads.
Gorgeous braid on the challah! Beautiful clicks.
Thanks Namratha.
That is a great braided challah and love how perfect the braids look. I agree that we need to plan well for bread baking. I find that on the days I am baking breads, I end up staying home all day. The challah has a great texture despite being eggless. Bookmarking to try this soon.
Thanks a lot Sandhya… That’s what I did for my other breads. Ended up staying home.