

Incorporate ragi flour into your diet with this quick and instant no-soak and no-ferment ragi idli. Healthy and delicious recipe perfect for any meal!
I always make a big batch of idli-dosa batter during the weekend, and I can’t imagine my weekdays without idli dosa batter. Having idli-dosa batter gives me a peace of mind; seriously, I am not kidding. You can whip up idli, dosa, uthappam, paniyaram, and what not?
But I miss making idli dosa batter on some weekends, and I started experimenting with some instant idli recipes. This ragi idli won unanimously, and this has become our favorite idli recipe these days, even when I have an idli dosa batter.
The three main ingredients – ragi flour, flattened rice, and roasted semolina
I did not make this idli only with ragi flour. I don’t want the idli to taste more like ragi mudde – the ragi balls. Also, we all like soft and spongy idlis.
The ground flattened rice and semolina make this ragi idli soft and spongy and gives a fantastic texture. It also balances the flavor, and you don’t need to worry about the raw flavor of the ragi flour. My 11-year old approved this recipe, and that says it all.
I wish I could say this is a no-grind, no-soak, and no-ferment idli, but you need to grind the flattened rice, which you can do it with a coffee grinder and no specific blenders or equipment needed. You can skip the flattened rice and use semolina instead, and it will be a typical rava idli.
Now coming to my version, I used ½ cup of ragi flour and took ¼ cup of semolina and ¼ cup of flattened rice or poha, which I then ground into a fine powder. The recipe is more like rava idli. That’s why I am calling it as ragi rava idli.
Now coming to the recipe, it’s very straightforward. You mix the ragi flour, poha flour, semolina, and veggies with yogurt and water. Let it rest and then add some baking soda and steam the idlis the traditional way. You can add veggies of your choice and make it more healthy. I have used roasted cashews to mimic the MTR rava idli, but that’s optional.
Ok, let me share the ragi idli recipe without any further ado.
Prep-Work-
- Dry grind the poha into fine powder in a coffee grinder or a mixer jar.
- I have store-bought roasted semolina, so I used that. If your semolina is unroasted, roast it slightly for 2 to 3 minutes and let it cool.
Prepare the ragi idli batter-
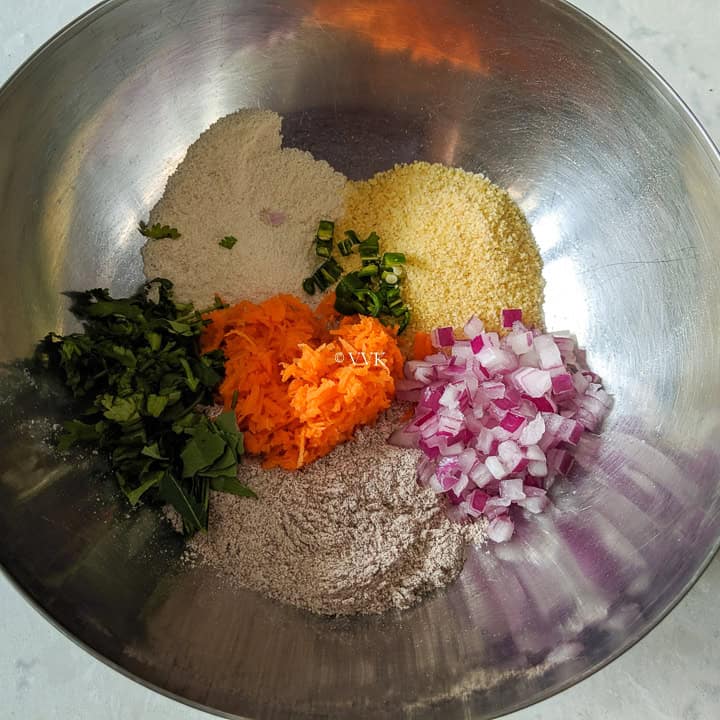
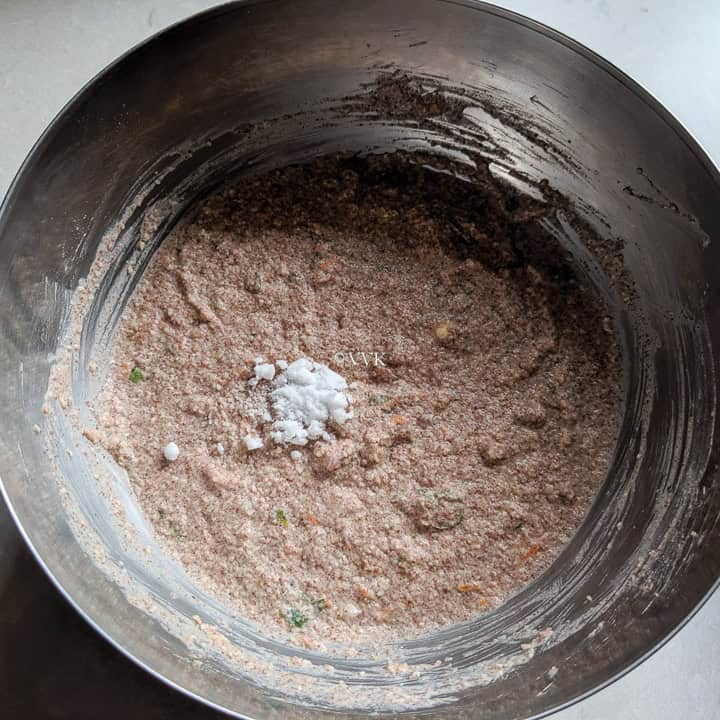
- In a mixing bowl, add the ragi flour, ground aval, roasted semolina, chopped green chilies, grated carrots, onion, cilantro, and curry leaves.
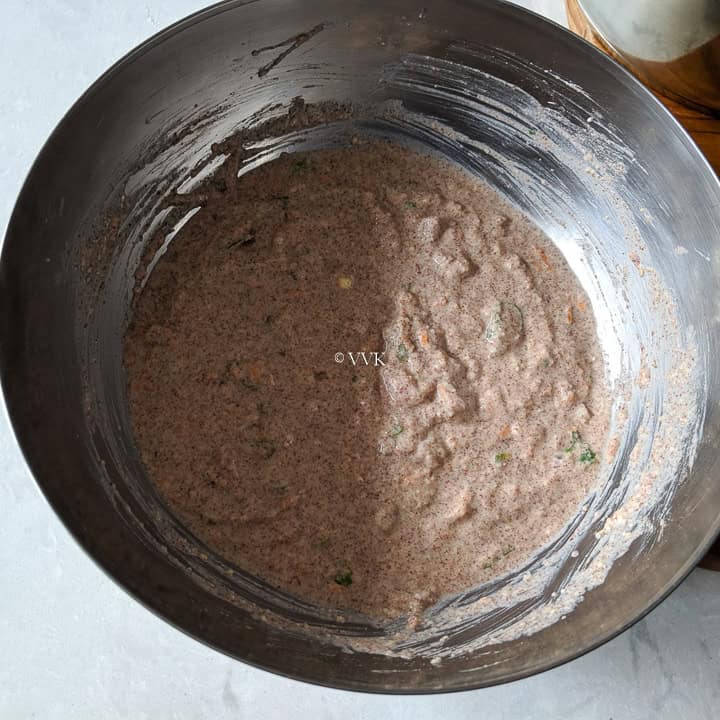
- Mix it and then add the yogurt, salt, and ¾ cup of water and mix again without any lumps. Let it sit for 10 to 15 minutes.
Roast the Cashews and prepare the idli trays-
- When the batter is resting, you can parallelly do this task. In a pan, heat the ½ tsp of ghee and roast the cashew nuts until they turn nice golden brown. (PS – I let a few pieces turn slightly brown, but it is entirely edible and doesn’t ruin the taste. )
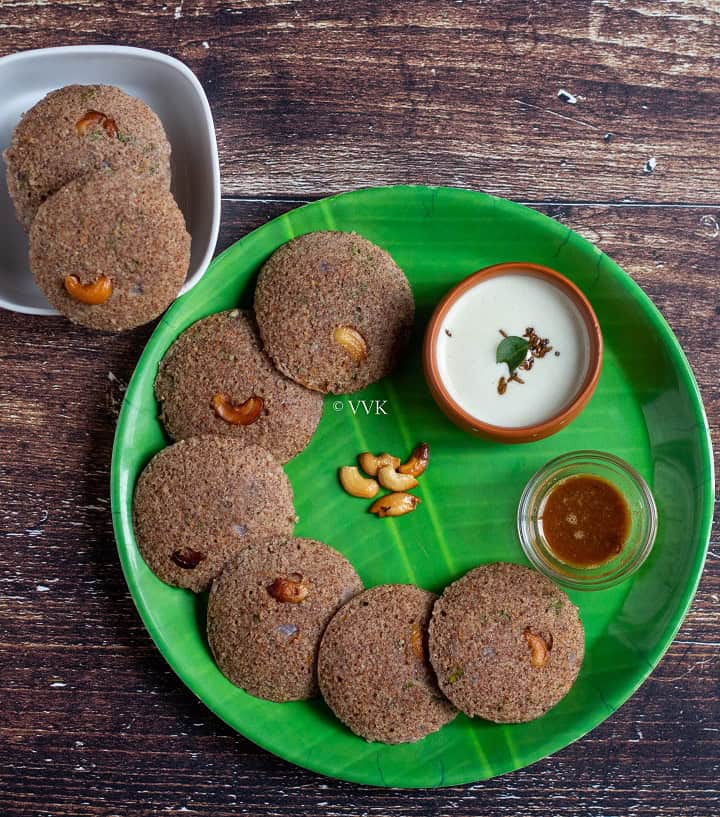
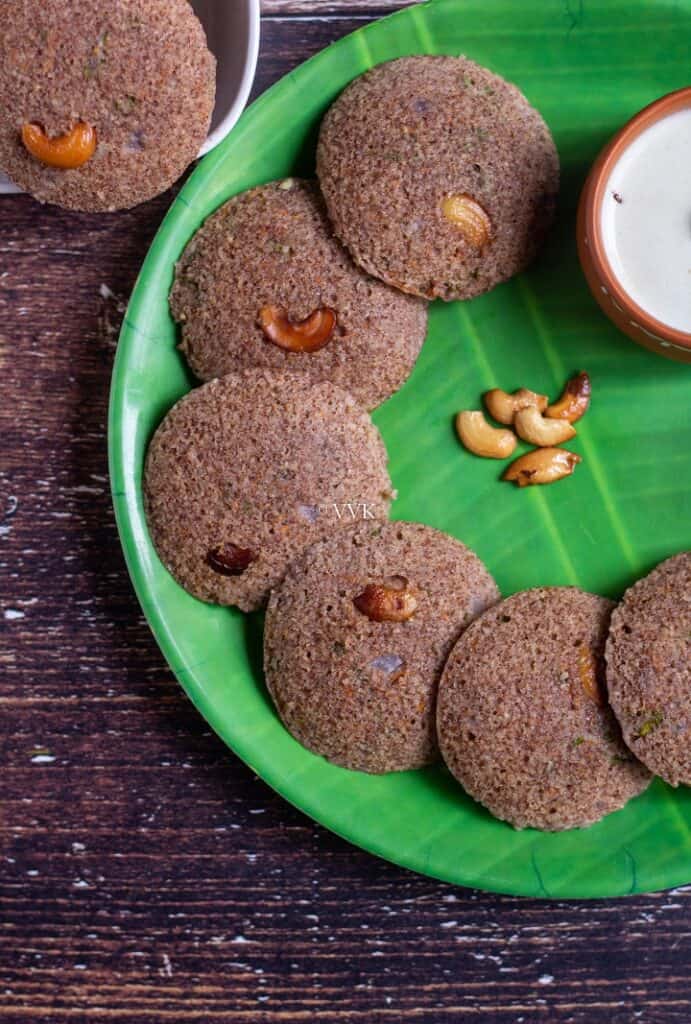
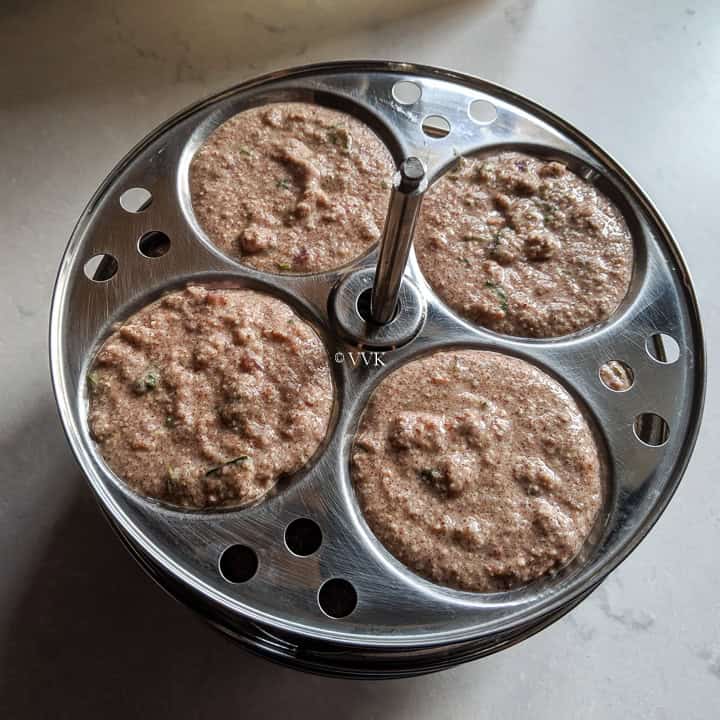
- Grease the idli plates with oil and place one roasted cashew in each mold, as shown in the picture. You can very well add the roasted cashews to the batter. But I place it this way so that the cashews pops out and makes it visually appealing.

- Add 1.5 cups of water into the idli cooker and bring it to a boil.
Adding baking soda to the batter and steaming the idlis-
- Now add the ¼ tsp of baking soda to the ragi idli batter. Add two more tbsps of water and mix thoroughly.
- Pour a ladle full of batter into each mold in the idli tray. Stack the idli trays and place them inside the idli cooker.
- Close the idli cooker and steam the idlis over medium heat for 10 minutes. After 10 minutes, turn off the heat and let it sit for 5 minutes.

- Then open the idli cooker and take out the idli trays. Wait for a couple of minutes and slowly remove the idlis from the tray with a wet spoon.
- Serve warm with chutney, idli podi, or with sambar.

Recipe Notes-
- You can add veggies of your choice but do not overload the batter with veggies.
- Also, you can skip cashews and make them nut-free.
- Instead of cashews, you can prepare a tempering of mustard seeds, cumin seeds and add it to the batter. It adds a nice flavor.
- I love the addition of poha as it adds a nice texture and balances the ragi flour flavor. But you can skip poha and add ¼ more cup of roasted semolina instead.
- Adjust the salt and green chilies as per your preference.
PS: Follow me on Instagram or join my Facebook Group for more gardening and recipe updates. If you try this instant ragi idli recipe, please don’t forget to comment and rate this recipe. If you have any questions, please leave a comment, and I will get to it asap. Make sure to follow me on my Pinterest for more healthy and delicious ideas!
📖 Recipe

Instant Ragi Idli | Finger Millet Idli | Ragi Rava Idli
Equipment
- steamer like idli cooker
- Mixing bowl
Ingredients
Measurement Details: 1 cup=240ml; 1tbsp=15ml;1tsp=5ml;
- ½ cup ragi flour
- ¼ cup flattened rice/poha I used thick white poha, grind it into a fine powder
- ¼ cup semolina roasted
- 2 green chili finely chopped
- ¼ cup carrot grated
- ¼ cup onion finely chopped
- 5 curry leaves
- 2 tbsp cilantro finely chopped
- ½ cup yogurt
- 1 tsp salt
- ¾ cup water plus 2 to 3 tbsps extra and 1.5 cups for steaming the idli
- ¼ tsp baking soda
Instructions
- Prep-Work:Dry grind the poha into fine powder in a coffee grinder or a mixer jar.
- I have store-bought roasted semolina, so I used that. If your semolina is unroasted, roast it slightly for 2 to 3 minutes and let it cool.
- Prepare the ragi idli batter:In a mixing bowl, add the ragi flour, ground aval, roasted semolina, chopped green chilies, grated carrots, onion, cilantro, and curry leaves.
- Mix it and then add the yogurt, salt, and ¾ cup of water and mix again without any lumps. Let it sit for 10 to 15 minutes.
- Roast the Cashews and prepare the idli trays:When the batter is resting, you can parallelly do this task. In a pan, heat the ½ tsp of ghee and roast the cashew nuts until they turn nice golden brown. (PS – I let a few pieces turn slightly brown, but it is entirely edible and doesn't ruin the taste. )
- Grease the idli plates with gingelly oil and place one roasted cashew in each mold, as shown in the picture. You can very well add the roasted cashews to the batter. But I place it this way so that the cashews pops out and makes it visually appealing.
- Add 1.5 cups of water into the idli cooker and bring it to a boil.
- Adding baking soda to the batter and steaming the idlis:Now add the ¼ tsp of baking soda to the ragi idli batter. Add two more tbsps of water and mix thoroughly.
- Pour a ladle full of batter into each mold in the idli tray. Stack the idli trays and place them inside the idli cooker.
- Close the idli cooker and steam the idlis over medium heat for 10 minutes. After 10 minutes, turn off the heat and let it sit for 5 minutes.
- Then open the idli cooker and take out the idli trays. Wait for a couple of minutes and slowly remove the idlis from the tray with a wet spoon.
- Serve warm with chutney, idli podi, or with sambar.
Notes
- You can add veggies of your choice but do not overload the batter with veggies.
- Also, you can skip cashews and make them nut-free.
- Instead of cashews, you can prepare a tempering of mustard seeds, cumin seeds and add it to the batter. It adds a nice flavor.
- I love the addition of poha as it adds a nice texture and balances the ragi flour flavor. But you can skip poha and add ¼ cup of roasted semolina instead.
- Adjust the salt and green chilies as per your preference.
Nutrition
I am not a nutritionist. The nutritional information is provided as a courtesy and is an estimate only. It varies depending upon the product types or brands.
Check out the Blogging Marathon page for the other Blogging Marathoners doing BM#116

Looks nice. Will definitely try. Just have one question can it be made in the microwave.. if yes how many minutes. Thank you😊
I have a Tupperware idli set for microwave use. I first boil the water for 3 minutes and then steam the idli for 4 minutes. I hope this helps.
I make instant ragi idli using rice flour and ragi flour. Using semolina and poha makes it so soft. Will try this way next time.
Please do try. I am sure you will love it.
I make ragi idli in a similar way but never added poha too it. Will try it next time and even the cashew in each, as my husband does not like this idli much, but adding nuts to it he might be less fussy :D :D
Please do try Renu. I am sure you will like it.
The Texture of the idli looks so good and this seems to be a nice idea for a Millet breakfast!! I should try it soon…
Thanks Sharmi. :-)
Adding poha to the ragi batter is interesting. I shall try this sometime soon. These instant idlis make life so easy, right?
Thanks, Harini. It adds a nice texture to the idli. And yes these instant idlis are life savers
Wow, this is surely some instant idli Srividhya..Yes, we too always stock batter as it comes handy. Having a good instant idli is a very good option too..
Very true Valli. Weekly twice or thrice idli will be there in the menu.